This is my unfinished plywood edge. The birch plywood top has 3 coats of matte poly on it, but the edges had not been finished on this side.
Eventually it will all look like this.
For my 3/4" plywood, I need a 7/8" wide banding, but Lowes only had 3/4". When I measured it against the edge of the plywood, it gave me a little bit of a lip, so I jumped in. It made the job a bit trickier because it means the alignment would have to be more precise.
This one is pre glued and is applied using an iron. We have this sewists, it's just like fusible.
You measure the side and add about 1" to hang off the ends. Or you can just unroll the banding and measure it against the actual table and cut it with a pair of all purpose scissors.
You'll also need an edge banding trimmer. My brother had two, he's still looking for them... shhh.
You'll also need to do some prep work. I had a mark from the circular saw, and the edge was a bit rough.
I used a 220 grit to sand it, I smoothed the high point down a bit but didn't totally eliminate it.
Place your veneer on the edge leaving a little off the end, and a little on the top and bottom. You can feel this with your fingers as you move along with the iron. The alignment is important because we'll be trimming the excess later.
This is a back up iron purchased at a thrift store for $7, I keep it for projects like this.
You'll notice that the glue will melt and the tape will stick. You'll move the iron down the edge, overlapping slightly, until you've reached the end.
You want to be careful that the edge of the plywood is not showing and the banding is completely covering it.
While the tape is still warm, you'll take either a roller, or another piece of smooth wood, to flatten the tape, and make sure you have contact between the plywood and the veneer. Push the edge of the wood firmly along the entire length of the veneer. If you see ripples or gaps, you can reheat and flatten again.
When you are sure you have the tape with a little excess on top, on the bottom, and on the edges. Leave it to cool.
You'll notice you have a lip along the edge that sticks up. That's perfect.
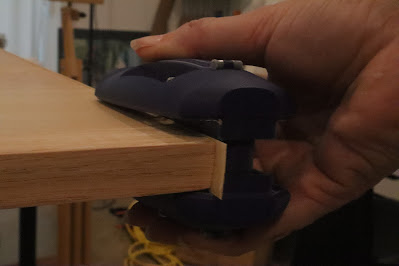
This is where the trimmer comes in. The u shape on the side is where the plywood fits. It has springs holding the top and bottom together, so you'll have to apply some force to catch the plywood.
Once you have it flush with the top and bottom of the plywood, still applying pressure, move the trimmer forward. You'll see that there are arrows that show you the direction of the trimming blades, move the trimmer in that direction.
You'll start to notice curls of wood rolling off the top of the trimmer. It's trimming the lip off the top and bottom.
You may have to go over it more than once to trim all of the over hang on the top and the bottom of the tape.
Next, you'll need to trim the over hang on the edges.
Using an exacto knife, hold it parallel to the edge and just push down gently.
Even if it's not perfect...
You can gently use the 220 grit sandpaper to finish the job.
Edge banding gives plywood edges a finished look, although, it is not necessary. I opted to finish my cutting table with the edge banding because my fabric was catching on the edge (and I wanted it to look pretty). You have a number of options for the edge, you can sand it so that it's really smooth, you can fill and sand it (because plywood sometimes has voids that you can see on the edge), or you can use edge banding. The edge banding looks really good when you use a veneered wood, and you match the banding.
The big box stores carry oak, birch, maple. The pine is usually pretty rough, so we used that for the base. When you go to buy your plywood, take your time, and take a friend to go through all of the pieces. Make sure the wood is flat, and not warped, and look at the grain to make sure you like it. The top on my cutting board is 3/4" birch, and it was heavy. You'll need a truck to get it home.
The banding for this project was $7.00, and it's enough to do one sheet of 8'x4' plywood. Measure twice cut once.
The cutters were free because I borrowed them. They aren't expensive though around $16.00.
For the base of my table, that was a double thickness, I purchased a very wide veneer on Amazon. That, had to be cut with an exacto knife, as the trimmer I had would not close around the edge. It was too thick.
The cost of this upgrade was $7, for the table top banding, $16.99 for the base banding, $24.00 to make it look more like furniture. If you have to buy the trimmer, $40.00. Since I can see my sewing room from my living room, it was worth it to me. So, if you try this project, it might be worth it to practice on another piece of plywood before jumping in. Also, if you can, it's easier to apply it if the plywood is standing on it's edge, and not installed as a tabletop. You have more control. Good Luck!


Comments