Corset Grommet installation - How to...
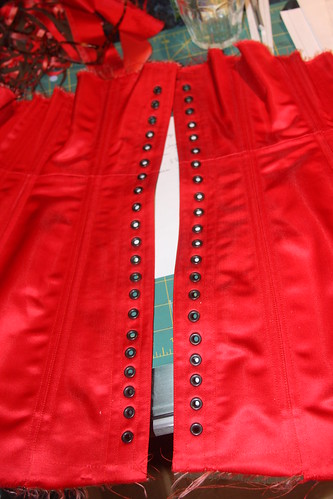
If you were wondering how the grommets look so nice down the center back of the corset, here's my secret.
You need:
Grommets (2 part grommet, if there's only one piece it's an eyelet and steer clear from those)
Grommet tool
Base
Die
Piece of soft wood
Hammer
Awl
Really sharp small scissors
The grommets used in this corset are size 00 - I bought the grommet tools as a set (die, tool, base, wood block).
MAKE A SAMPLE - Count your grommets and make sure you have enough for your project plus a few extra. Test the installation on that. Since I had fabric from this project I tested it, after all the die has to go through 3 layers of fabric here, I wanted to get a feel for the process.
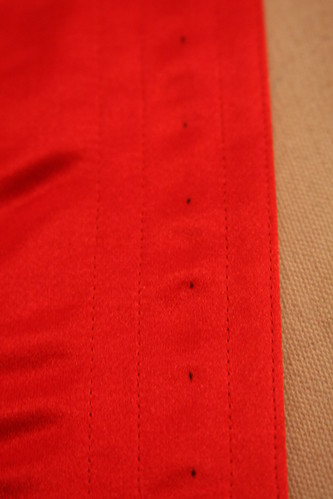
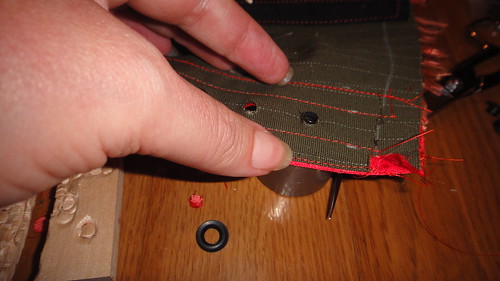
So you start by marking your item. I used a very fine point permanent marker (yes it was a little bold of me, but I tested it on a scrap to make sure the ink wouldn't run).
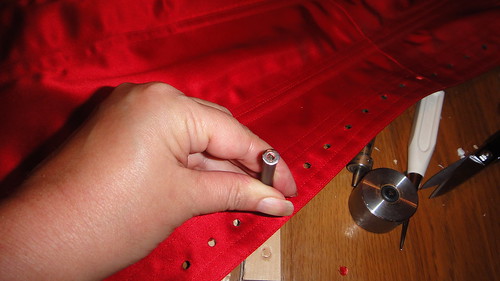
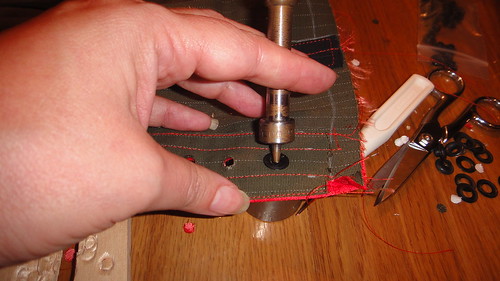
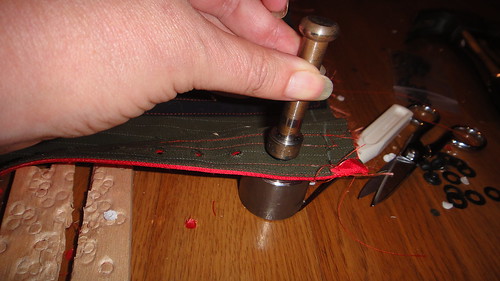
For the next step you'll need your die, hammer and wood block.
The die is a long tube, one end has a sharp edge which cuts through the fabric, the other is meant to take the pounding of the hammer. DO NOT EVER HAMMER THE WRONG SIDE - you'll damage the die and never get a nice cut from it again.

Place your die exactly where you want the opening being careful to line everything up properly. You'll notice my marks were not centered but the holes are, the die was aligned when the it was placed for cutting.
Make sure your die is centered on the wood piece below, and is straight up and down. You want to be certain that the die will strike the wood below evenly to make an even cut into the fabric. Strike the end with the hammer a few times before lifting. If you pick your die up and there's no clean cut you have the option of placing the die exactly where it was and continuing to hammer, or if you have a partial cut you can take your scissors and trim as needed. It takes me 2-3 strikes to get the die through cleanly. When the die was new, only once.
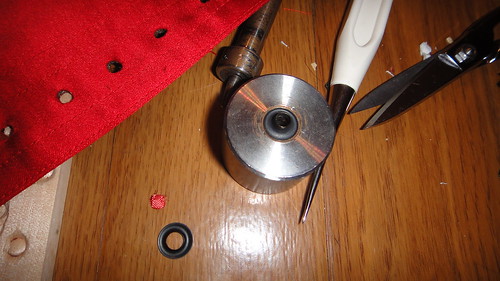
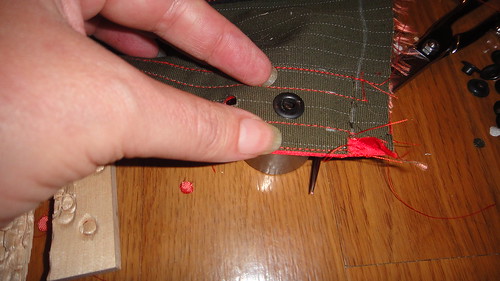
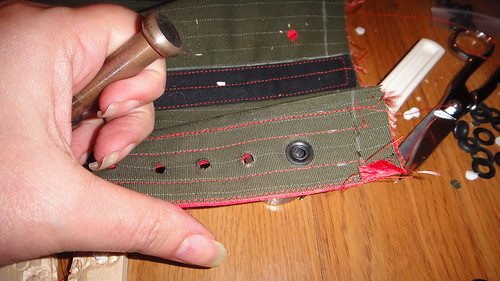
You'll notice that some of mine still have little tags, these were trimmed.
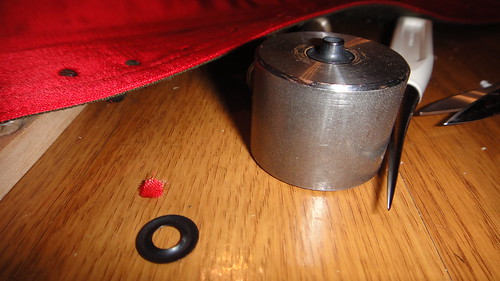
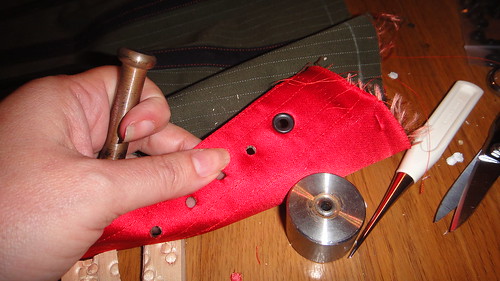
The grommet has two pieces, one that is tall, and the other that is flat (like a washer but curved).

Place the tall piece on the base with the shaft facing up, and the wider part nesting in the concave groove.
Place the face of the fabric down over the grommet.
Place the flatter piece over the grommet neck (curve side up).
Place the grommet tool in the center.
Make sure that the bottom grommet piece is still nested in the base, and hammer it in.
Now a few things can happen here, your tool gets stuck in the grommet. Line everything up again and give it another good whack with the hammer, it should release.... or it's perfect :) yay!
It's very gratifying to finish, and it releases stress.
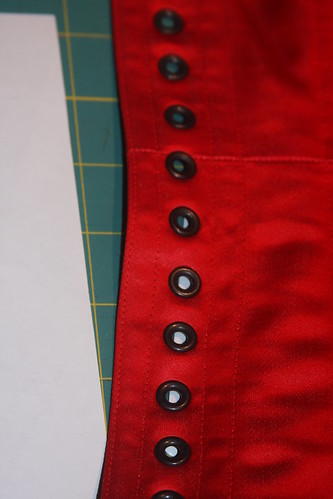
You can open the holes with an awl, I tried that once and it just didn't work for me. There was too much bulk and forcing the grommets through didn't give me a nice clean edge, and it just took longer. So I hope this helps you with any future grommet projects, this method works best for me.
You need:
Grommets (2 part grommet, if there's only one piece it's an eyelet and steer clear from those)
Grommet tool
Base
Die
Piece of soft wood
Hammer
Awl
Really sharp small scissors
The grommets used in this corset are size 00 - I bought the grommet tools as a set (die, tool, base, wood block).
MAKE A SAMPLE - Count your grommets and make sure you have enough for your project plus a few extra. Test the installation on that. Since I had fabric from this project I tested it, after all the die has to go through 3 layers of fabric here, I wanted to get a feel for the process.
So you start by marking your item. I used a very fine point permanent marker (yes it was a little bold of me, but I tested it on a scrap to make sure the ink wouldn't run).
For the next step you'll need your die, hammer and wood block.
The die is a long tube, one end has a sharp edge which cuts through the fabric, the other is meant to take the pounding of the hammer. DO NOT EVER HAMMER THE WRONG SIDE - you'll damage the die and never get a nice cut from it again.
Place your die exactly where you want the opening being careful to line everything up properly. You'll notice my marks were not centered but the holes are, the die was aligned when the it was placed for cutting.
Make sure your die is centered on the wood piece below, and is straight up and down. You want to be certain that the die will strike the wood below evenly to make an even cut into the fabric. Strike the end with the hammer a few times before lifting. If you pick your die up and there's no clean cut you have the option of placing the die exactly where it was and continuing to hammer, or if you have a partial cut you can take your scissors and trim as needed. It takes me 2-3 strikes to get the die through cleanly. When the die was new, only once.
You'll notice that some of mine still have little tags, these were trimmed.
The grommet has two pieces, one that is tall, and the other that is flat (like a washer but curved).
Place the tall piece on the base with the shaft facing up, and the wider part nesting in the concave groove.
Place the face of the fabric down over the grommet.
Place the flatter piece over the grommet neck (curve side up).
Place the grommet tool in the center.
Make sure that the bottom grommet piece is still nested in the base, and hammer it in.
Now a few things can happen here, your tool gets stuck in the grommet. Line everything up again and give it another good whack with the hammer, it should release.... or it's perfect :) yay!
It's very gratifying to finish, and it releases stress.
You can open the holes with an awl, I tried that once and it just didn't work for me. There was too much bulk and forcing the grommets through didn't give me a nice clean edge, and it just took longer. So I hope this helps you with any future grommet projects, this method works best for me.


Comments